Wednesday 24 October 2012

Filming In 'Mr Simms' Sweet Shop


'Mr Simms' Sweet Shop


For the health and safety issues from this shoot please click link. 

This particular part of that days shoot was not part of the plan that we had initially come come with, however as a group we thought it provide some nice footage. because we had not thought in advance of shooting here we had to adapt our plan to fit around this location, also considering health and safety.

So, as mentioned in the previous post, the first thing we had to do before thinking about anything else, was ensuring we had permission to film inside, otherwise any planning would have been useless.
After this, we had a quick look around the store to see what shots would best to get and how we could make the most of the time we had in here. We noticed that the lighting was quite interesting, so thought that for one set of shots, experimenting with the white balance, aperture, shutter speed etc would be worth doing.

Here is a short clip showing how different the lighting looked after we had changed these setting.


oxford sweet shop 1 from Sammie Masters-Hopkins on Vimeo.


I put the two clips of each setting, capturing the same footage next to each other in this clip, in order to show the difference in lighting. The first half of this clip, a had a noticeable orange tint to the lighting. (the settings on that particular piece of footage were, Aperture: f/22.5, Shutter Speed: 1/500, ISO: 3200 and White Balance: 8000k). To amend this, we left the aperture and shutter speed as they were but changed the ISO setting to 64 and the White Balance to 2500. These were the settings for the second half of the above clip (changes at 0.04seconds). These differences in settings made a drastic change as you can see, making the lighting look much better.


The footage below is some further experimentation with angles and settings. Immediately below we have a short clip of zooming into the centre of the candy canes, we thought this could potentially create an interesting effect. As you can see from the fact the footage is not very steady, we used a hand-held technique and used a zoom lens. The hand-held technique is conventional of the new wave so in this regard we can link it to our brief.  As you can see, the effect got from this test, was a focus shift, the begging of the shot began with the entire area being in focus and as we zoom closer the aperture settings automatically changed, giving us focus in the centre and out of focus around the edge suggesting we changed to around an f/22.


MVI 6396 from Sammie Masters-Hopkins on Vimeo.


This piece of footage below has some link to the new wave as we are getting a reflection of ourselves in the shop window. Although this was not initially intentional, we kept hold of and made use of the footage to show a slight lack in continuity, which is often found in the films of the new wave movement. This could be due to limited budget meaning that reshooting was not possible or it could have been an intended technique to show a strong difference between the films if the new wave directors and mainstream Hollywood movies.
Overall, this is not the best shot we could have achieved, the framing appears to be off balance and the reflect means that it is hard to focus on the main foreground image.


MVI 0628 from Sammie Masters-Hopkins on Vimeo.


Oxford Shoot (Includes scans of signed permission forms)

Oxford Shoot
Tuesday 24th October 2012

For the health and safety for this shoot please click link. 

As we had thought about what it was we wanted to do with our time in oxford in advance of being here, we started by heading towards the first location we intended to shoot, Cowley Road. This took longer than anticipated as we stopped on more than one occasion to shoot footage of places we came across on the way to the location. although this did interrupt our schedule, meaning we didn't get to final destination we had planned to go to, it also did provide us with interesting, useful footage we hadn't intended on shooting.
We walked down one of the streets in inner oxford and decided to shoot a small amount of footage, giving us some establishing shots of our area, which will have a brilliant contrast to some of the grittier locations in our previous shoots.


Another stop along the way to Cowley Road was an old-fashioned style sweet shop that caught our eye. Opting again to stop and shoot some footage here as we felt the inside of the store would have a great effect and also provided a vast array of colour and interesting lighting for us to shoot, allowing us to experiment with white balance/shutter speed etc. The only problem with shooting was the fact to go inside the store we would of course need permission from the store owner/manager. Thankfully we had release forms with us that could be signed. (When we first arrived, it was soon relies that the release forms that were ready in advance had been forgotten, however after a short discussion on how to handle the problem, we found that there was a pubic library very close by and so we could easily go and get some new copies printed, without wasting too much of out time).So we headed into the shop and approached one of the staff members, explaining our project and what we would like to shoot inside the shop. After having gained permission and had the release form signed, we began setting up some equipment, the shop was fairly small so we had to be careful of where were placing our equipment so as not to damage anything. We were kindly asked not to film any of the customers that came int the store, which we were happy to oblige to, the shop was fairly quiet anyway which made the task slightly easier. 
This part of the shoot was particularly enjoyable as it was something and somewhere different for us to shoot, as i said before, we had a different kind of lighting to work with etc. Another thing that i had noticed about this shop was how perfectly it was laid out for filming in, the shelves we all stacked in almost perfect symmetry, which made it a pleasure to film in. We got some lovely shots, in particular, close ups of the brightly coloured packaging.


We eventually made it to Cowley Road after multiple stops and shot a small amount of footage in 'grittier' street and got some lovely shots of a large wall of graffiti, providing brilliant contrast to the earlier footage of the day. 
After this we headed straight for the record store that we had intended to go to in the first place, on coming across it, we again had to seek permission to film inside the shop, which was given almost immediately, so after a short explanation of what we were here to do the manager signed the release form and we began setting up. We also took this opportunity to ask the manager if would like to take part in a short interview which gave us chance to set up and make use of the boom mic. (more detail on this to come in later post).


From here, we went on to find The Turf Tavern, a small famous pub situation off an alleyway in the heart of Oxford, and again got permission from a member of staff to film there and proceeded to get some beautiful shots of the very picturesque location.

Overall, the day turned out to be fairly successful, despite going slightly off schedule and not making it to Jericho (which would have been our final location of the day), the footage we did achieve turned out well, with limited issues thanks to some careful planning in advance of setting out.


Oxford 1 from Sammie Masters-Hopkins on Vimeo.

The footage above was the first piece of footage we shot during our time in Oxford. This panning, offers us something of an establishing shot of one of the main high streets in Oxford. we were also also able to capture some nice colour from the painted buildings in this shot.
As you can see, the whole image is in focus, suggesting a small aperture, an f/22. This meant that little light was getting into the camera, so we had to alter other settings in order to counteract this problem, otherwise our footage would have ended up under-exposed. Due to the fact that there was a lot of movement in our shot, we did want to be slowing down the shutter speed to let in more light, this would have caused a lot of blurring, so instead it was the ISO that had to of up slightly, thankfully the natural daylight want the image began fairly bright so we didn't need to up the ISO to the point where we had a lot of grain in the image.


Permission Forms

Here is scans (hard copies are also available) of the permission forms we had to get signed in order to film in some of the locations we chose during our shoot in Oxford. These were filled out in order to gain permission to film in the sweet shop and in the record store.


Monday 22 October 2012

Preparation For Oxford Shoot/Recorded Meetings

By shooting in Oxford, we are hoping to gain some effective and innovative shots, that will expand the variety we are building upon. Oxford has some beautiful architecture and interesting places (such as the The Turf Taven) that will make for some great footage. (in the case of The Turf Taven, this is depend upon whether we can get permission to film in there of course). The footage we will get in Oxford will be a good contrast to the footage we have shot so far, this is due to the fact the Oxford is a more affluent area in comparison to our local area. The contrast we can achieve with these opposing mis-en-scenes will further question the state of contemporary society, how one area can be so well off whereas another can be the complete opposite. This maintains a link with New Wave, as questioning contemporary society os something the directors continuously did in their film making and will therefore mean we are following the outline of our brief. 
What is great about this opportunity to venture further out, is that we will be able to get shots, that we may not otherwise be able to achieve. Provided we can get a good composition within the frame, we are likely to gain some beautiful shots, and hopefully interesting vantage points/images. Also providing a great contrast to the footage we have already got in the local area, which is much grittier than Oxford.
In preparation for our shoot in Oxford tomorrow, we have compiled a list of equipment/shots etc that will help to organise our day, allowing us to make for use of the limited shooting time we will have. 


Equipment List

Cameras - 1Canon 500D and 2 Canon 600D, 1 Small digital camera (lumix)
Tripod
Boom
Reflector
SD Cards
Laptop (external hard drive?)

Umbrella (dependant on weather check)


Health and Safety

As we are travelling a good distance for this particular shoot, we are coming across health and safety issues that we have not come across as yet, therefore it is vital that we go over all health and safety issues, beforehand, as well as when we are there on the shoot tomorrow. As we have not had the chance to see the area and do risk assessments, this is something we will have to do before beginning shooting and therefore thinking about all potentially issues is a must.
For example, we have to be aware of our surroundings, i.e. the conditions of the grounds we are working on, if uneven we have to be cautious so not injury or damage is caused. The weather is another consideration, though this can be check for the area before going we still ought to be prepared for any case, meaning waterproof coverings for equipment and warm clothing for ourselves should be taken.
We have to aware of the people that are around us, we know that Oxford is going to busy which means our attention must be at its peak in order to keep track of all equipment to prevent loss, damage or theft.
When entering premises we must be aware that before any filming can begin., a permission for must be signed and dated and any rules given by owners are strictly followed. Again, doing risk assessments of new areas, looking for potential hazards (electricals, uneven grounds etc) is needed in every new location. We must be sure that travel arrangements are in place and all safety precautions are taken doing the journey.


Sound Testing

We intend on testing the use of sound during our shoot in Oxford, using the internal camera mic and also an external mic. To prepare for this, we had a tutorial on how to set up and use a boom mic.


Recorded Meeting

The video below is a recorded meeting of our preparation for filming in oxford, planning what footage we want to get, where we would like to go etc.


meeting 2 from Sammie Masters-Hopkins on Vimeo.


The video below here is a meeting of general filming preparation for other filming shoots. What kind of footage we want to shoot etc.


Below is a screen shot of an e-mail I sent out to the rest of the group when deciding upon other venues.


Wednesday 17 October 2012

Occupational Health and Safety Tutorial

Occupational Health and Safety (OH&S)
(Tutorial on 02.10.12)

Health and safety regulations are something that crop up in any industry, strict guidelines are put in place to ensure the safety of employers/employees that are working for a business. Each business will have its own set of guidelines depending upon the kinds of hazards that may be in and around their work environment.

Film sets often have a very complicated set of guidelines due to the variety of locations that filming may take place, each location will have a different equipment list and different potential hazards, meaning that each location needs a new OH&S check. For example, should shooting move from a set to an on location shoot outdoors, we immediately run into problems such as weather and the general public, these are less problematic points when shooting in a studio.

Guidelines are put in place, and then hazard perception and risk assessments must be carried out to ensure any risks are managed and controlled correctly. The guidelines are designed to be a preventative, putting a stop to any problems occurring in the first place and not just tidying the mess after.

Just a handful of examples may be:

  • When in a studio set environment:
    • Cables and wires being incorrectly secured down to avoid tripping - causing damage to equipment and potential harm to crew member
    • Liquids around the set (i.e. drinks) - damage to equipment if spilt, also risk of slipping if spilt on floor
    • Equipment not being set up properly - again, causing damage to equipment and risk of harm crew member
    • Heat from studio lights - burning crew members if not handled correctly and also if in a small studio set risk of fire may be increased
  • On Location sets:
    • Harmful/unsanitary objects (i.e. broken glass/needles etc) 
    • Violence/gangs/criminals in area may pose a threat
    • Theft/damage to equipement
    • Uneven ground

All of these must be considered and assessed before any shooting begins. Visiting the location before the day of the shoot is always beneficial, it allows you to assess the risks and come up with any necessary procedures that will prevent problems being caused by the risks. Each shoot must have its own risk assessment, as not all procedures will be effective every time. 

Tuesday 16 October 2012

Low Key Lighting Shoot/Innovative Lighting/Using 'Barn Doors'

Low Key Lighting
Monday 15th October


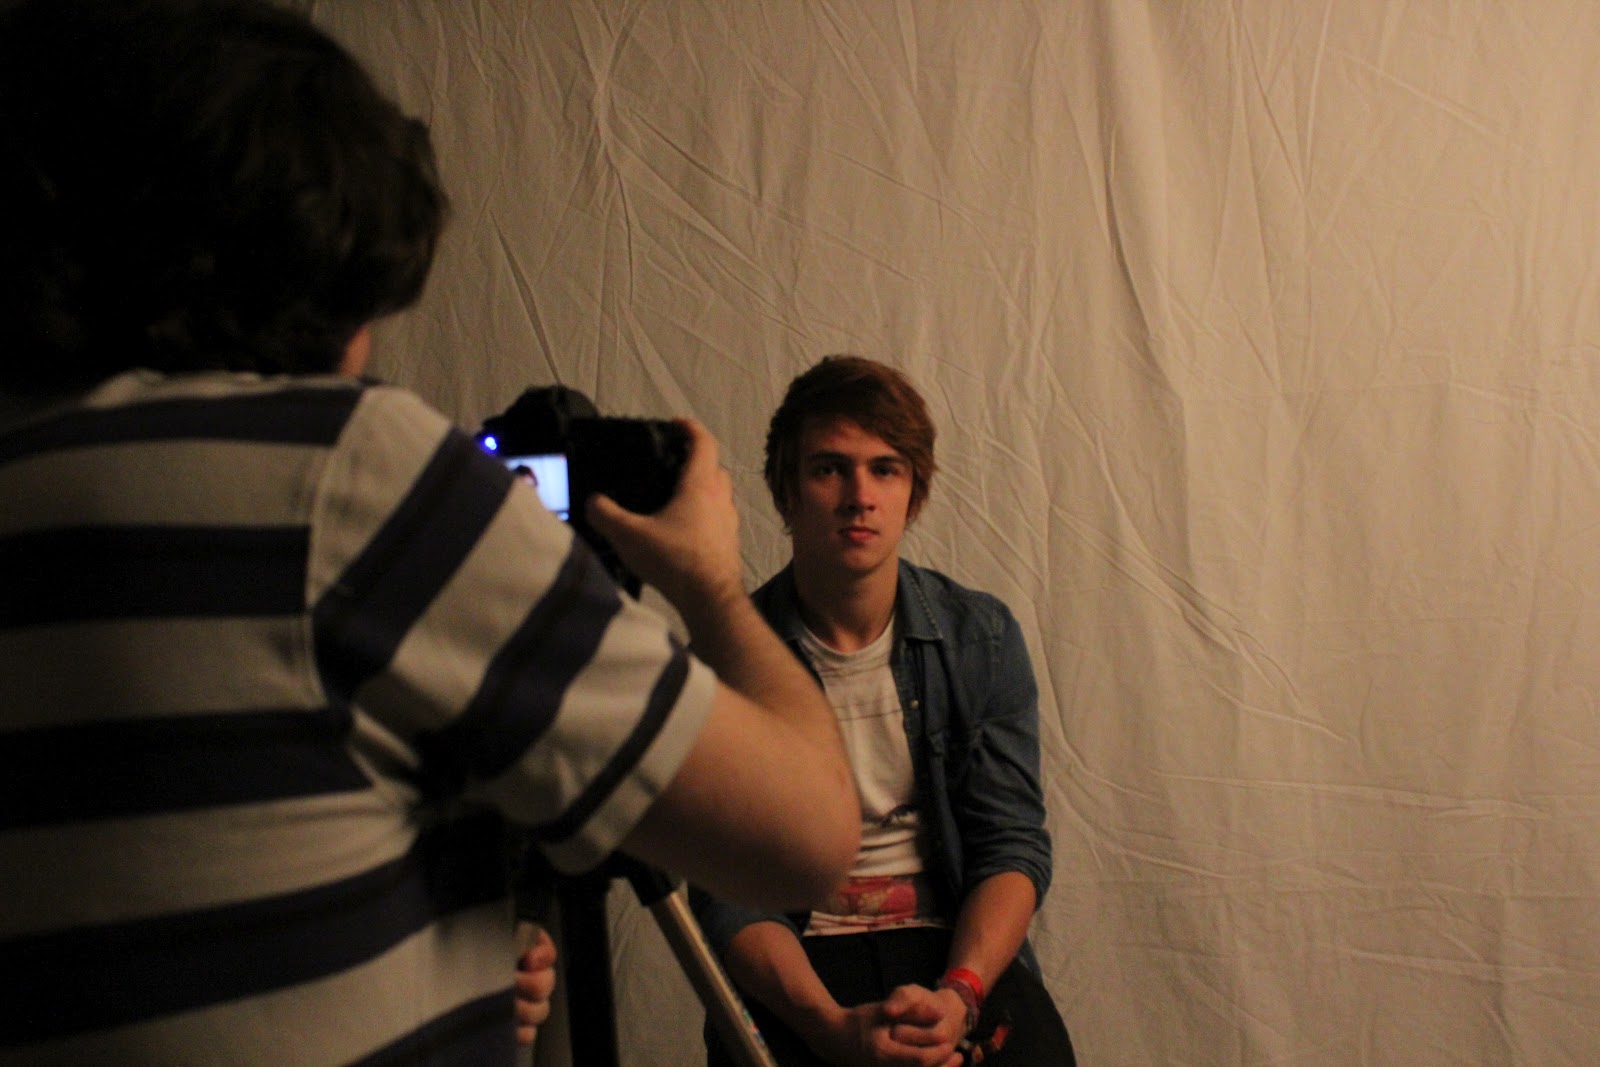
We had decided that we needed to a little more in the way of lighting techniques, as we had only done a couple of shoots which had included lighting experimentation. This time we opted to do a shoot that was primarily based around the use of low key lighting (we incorporated this into a shoot in which we shooter footage specifically for editing - see 'Editing' page).

Equipment List

  • Camera - 1 Cannon 500 D DSLR, 1 Lumix 
  • Tripod
  • Small Studio Spot Light (including Barn Doors)
  • Back Drop Sheet
  • Extension Lead

OH&S

When doing a studio lighting shoot, as with any shoot in fact, we must consider any health and safety issues that must be addressed before started the shoot. Being that this was a studio set environment, we must apply accurate health and safety checks and procedures to ensure the safety of all crew members and equipment.

Main Potential Hazards:

  • Cables not being secured down correctly - this could cause harm to a crew member as they may trip on the cable, cause injury and also may cause damage to the equipment the cable is attached to. To prevent this, checks must be carried to out to ensure any wires are taped down to decrease the falling of tripping over them. 
  • Heat from studio lights - All studio lights will get very hot when left on for any period time, this is something that cannot be stopped but if correct procedures are carried out any problem due to this can be avoided. All crew members must be made aware of the heat that the lights will emit, perhaps warning signs on the lights and around the studio would help this. Then when packing away, lights musts be left to cool, this decreases the risk of injury while also preventing any risk of fire that may come about if lights are packed into bags before cooled. 
  • Equipment Incorrectly Set Up - This would not only end in damage being caused to the equipment but also may end in harming a crew member, if not set up properly equipment could fall. This would be prevented by through checks of equipment set up but also ensure al crew members handling equipment are correctly trained and competent in setting up, avoided any unnecessary problems. In this case, it was the lighting set up that was most important.
  • Back Drop Falling - As we were in a studio, we were using a backdrop being the subjects we were filming. The hazard with this is that the back drop sheet could fall if not correctly caused (this is something that occurred during our previous studio lighting shoot). This problem must be solved as it could fall on a crew member causing them an injury. not only this, but it would also disturb the shoot, wasting time putting it back up again. 


By trying out low key lighting technique for this shoot, we have been able to experiment now with several forms of lighting. This one proved to be particularly interesting as it allowed us to experiment with new ways of lighting and creating the perfect image.
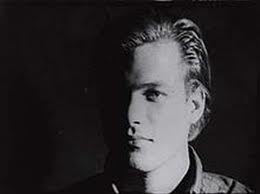
In particular, when shoot the doll (that you can see in the above images), we began by using the small studio lighting and sitting in on a chair to get the prefect angle for the light to hit the subject that sat directly in front of the camera on a table, we initially found the lighting was too bright, the light source must have been to big. But by experimenting with the use of the barn doors* fixed to the light, we soon found that by closing them slightly, we were able to find the right amount of light that suited the image. However when reviewing the footage back on the camera, we became aware that the light was causing too much highlighting on the back drop sheet (this sheet was white, we feel black would have been far better our shoot), as we did not have any other back drop sheet. We attested different ISO setting to see if altering the amount go light entering the camera made any difference, but this proved to be ineffective. We had to improvise to improve the quality of our footage, this led us to attaching four large sheets of black card (would have been preferable in a matt finish to stop the light reflecting but what we had worked well enough for us to achieve the look we were after), this stopped the highlighting and gave the image a far more professional look, bettering the focus of the foreground too. We used the same technique when filming the bowl of soup on the table, the blacked out background gave a brilliant saturated colour, the yellows and blues of the table cloth were brilliant and vivid.

When it came to filming the human subjects at the table, we again continued to use the black card to create a good backdrop, but this time we found that even by closing the barn doors on the light closer together, the light source still seemed too big for the subject. This again led us to improvise somewhat to achieve the right amount of light we needed to achieve the hard lighting effect we were after. Therefore, as we did not have a candle or torch light, one of the crew members suggested the flash light app that you can get on an iPhone, though this is clearly not the conventional method it proved to be fairly successful (as you can see from the images above).

Using a method like this, which may seem unusual, in fact adds to the idea of comparisons to the French New Wave. Unconventional and low budget techniques, making use of sources readily available to the film-maker. Especially as we found it effective and useful, using cheap, low budget techniques can be proven to pay off. An example of low key within the new wave films would be the majority of the scenes shot in the flat of the family in Truffaut's 400 Blows.

The clip below, is a shot reverse shot edit of some of the low key light footage that we shot. You'll noticed a few more New Wave references within the edit. Firstly, the lack of continuity here is very reflective of the new wave movement, you can see this by paying attention to the bowl of soup placed in the centre of the table. The spoon often shifts position and is sometimes in the hand of the subject, other times it is not.
There is also, a quick but noticeable jump cut, that flashes up an image of a doll part way between one shot. This also adds an element of surrealism, branching out our new wave references further, by incorporating slight Czech references as well as the French.


Kuleshov Effect -Table Scene from Sammie Masters-Hopkins on Vimeo.


* Barn Doors - Are four 'leaves' attached to the spotlight used often in film, television and theatre. These 'doors' allow the user to direct and shape the light, giving the user more control of how their subject will be lit, moving it away from where it doesn't want to be.

Wednesday 10 October 2012

Using A Single Light Source

For the health and safety from this shoot please click link. 

We shot this particular piece of footage high contrast monochrome to reflect the style of the Neuvelle Vague, which more often than not includes films that are shot in this way, meaning we are in keeping with our initial brief. The fact that this is a fairly cheap form of lighting, is something that links it with the Neuvelle Vague as these are films that were shot on a small budget (Godard's A Bout de Souffle had an estimated budget of around around FRF 4-500,000, which is about a third of the average films budget at the time).


You can from the this screen shot above, taken from Truffaut's 400 Blows, that the subject is shot using minimal light. The shadowing on one side of his face suggests that the larger light source is coming from his left side, hence the strong shadows on his right cheek. In this scene the young boy from the film, has been put into a holding cell in a police station. We would imagine that the light source would be big enough to fill the room, however, due to the position at which the subject is placed he is not lit particularly well. Creating light shadowing on one side of his face, we can assume that there is in fact only one light source.


Edge Lighting 

This edge lighting technique, is the one I feel we achieved most successfully. As you can see from the clip below we managed to achieve a nice shadow on one half of the face with the eye still slightly in view. This looks particularly effect in high contrast monochrome, creating atmosphere, an air of mystery and a nice aesthetic for the shot.

I feel that the composition of the this particular shot is the best out of the three lighting techniques we tried. The subjects eyes are at a good level within the frame and he is well centred, ensuring we followed the rule of thirds.The subject in the foreground is in perfect focus, helping the technique to look as professional as possible, and the backdrop is slightly out of focus as we chose to use an aperture with a small f-stop number giving us quite a shallow depth of field.

 
Edge lighting no reflector from Sammie Masters-Hopkins on Vimeo.


Butterfly Lighting

The Butterfly lighting technique was a common lighting technique used in 1950s classical Hollywood movies (as mentioned in previous post). The idea behind this technique was that it supposedly made the subject more attractive, most commonly used on female subjects. We opted to stick with this norm and also use a female subject in our own test.


This clip is the technique without the use of a reflector

butterfly lighting mo reflector from Sammie Masters-Hopkins on Vimeo.


 Rembrandt Lighting

Rembrandt lighting comes from the way in 17th century artist, Rembrandt, lit his subjects before painting them. This is quite a classic style of portrait lighting, easily recognised by the illuminated triangle beneath the eye on the shadow side of the face.
To achieve this (as mentioned previously) the angle and position of light, camera and subject is vital. As you can see from the clip below, we did manage to achieve this lighting without the use of the reflector. We did experiment using the reflector, but again you can see from the second clip below, that the reflector did not achieve this rembrandt effect as well as without, it lowered the contrast meaning the signature illuminated triangle was less noticeable detracting from the effect the technique should have.


Rembrandt Lighting no reflector from Sammie Masters-Hopkins on Vimeo.

Tuesday 9 October 2012

Studio Lighting Techniques

Lighting Test: Portrait Lighting
Tuesday 2nd October

(footage on next post) 

During our last shoots, we had not experimented much with lighting, so we decided to experiment with some studio lighting techniques. We experimented with the portrait lighting techniques that I mentioned in the previous post.

We did run into some initial problems before we managed to get started. After setting up for the first shoot, we discovered that the flash trigger on the camera did not seem to set off the flash on the umbrella light. This was something that would seriously hinder the shoot had we not managed to fix the problem, we need the flash to add to the lighting techniques that we wished to try out. We had a technician come and look at the equipment and he managed to solve the issue.  Another issue we ran into, was that the white back sheet was too heavy to stay on the pole, we therefore had to improvise with a white sheet to ensure we had a plain back drop for the footage. The only problem with this was the sheet was very creased, giving the background too a footage a somewhat unprofessional finish. However, once these problems had been overcome we managed to get back on and complete the test with the remaining time.


These first three images are us setting up
for the Rembrandt lighting technique.


Ensuring that we have the light source and
camera angles in the correct place.


This is shooting the Butterfly technique.

We tested out the butterfly technique with
the reflector to see if it added or improved the image.


Finally, we experimented with the Edge lighting technique.

Again, ensure the light was in the correct place
was essential.


Health and Safety

During this shoot, there were additional health and safety hazards that must be considered on top of the ones we would consider for an on location shoot. For starters we must make ourselves aware of all the fire exits in the room should we need to use them, ensuring they is a clear pathway to them. This is especially important as we would be using studio lighting and the lamps get very hot. This means we must ensure the handling of these is carried out sensibly, when turned off they must be left to cool before any crew member handles them  (protective gloves are advisable) and ensure no flammable material is close by.
As we would be handing electrical equipment we must ensure any wires are taped to floor, this will prevent any trips or falls that could lead to injury or damaged equipment. another point to consider would be that when plugging and unplugging equipment, sockets must be switched off until plug is in place.
We had to ensure that the back drop sheet was securely in place, careful placing of the sheet is vital, should a stool or ladder be need to reach then sensible use is a must, somebody steadying the bottom a ladder (should one be used) is advisable.


Andy Warhol Link 

Something that I did notice about this shoot, was the similarities to Andy Warhol's 'Screen Test'. In these 'Screen Tests' were a series of silent films in which Warhol placed a camera in front of 'Warhol celebrities' and friends (for the most part they were amateur or non-actors) and created moving portraits. The subjects were asked to not speak or move and on occasion were left alone with the camera.
The black and white footage, long takes and use of non-professional actors, all shot on a low budget have a lot of relation to the new wave. This was a piece of work that he did in the 1960's, again reflective of the Neuvelle Vague as it is around the same time period.

You can also see from the stills below that Warhol used similar lighting techniques the ones we experimented with on this particular shoot.

Here we can see an example of REMBRANDT
lighting, noticeable by the signature illuminated
triangle beneath the eye.


This is an example of extreme EDGE lighting,
one half of the face is entirely in shadow.