Tuesday 2nd October
(footage on next post)
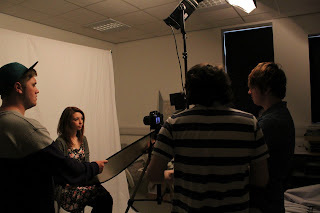
During our last shoots, we had not experimented much with lighting, so we decided to experiment with some studio lighting techniques. We experimented with the portrait lighting techniques that I mentioned in the previous post.
We did run into some initial problems before we managed to get started. After setting up for the first shoot, we discovered that the flash trigger on the camera did not seem to set off the flash on the umbrella light. This was something that would seriously hinder the shoot had we not managed to fix the problem, we need the flash to add to the lighting techniques that we wished to try out. We had a technician come and look at the equipment and he managed to solve the issue. Another issue we ran into, was that the white back sheet was too heavy to stay on the pole, we therefore had to improvise with a white sheet to ensure we had a plain back drop for the footage. The only problem with this was the sheet was very creased, giving the background too a footage a somewhat unprofessional finish. However, once these problems had been overcome we managed to get back on and complete the test with the remaining time.
 |
| These first three images are us setting up for the Rembrandt lighting technique. |
 |
| Ensuring that we have the light source and camera angles in the correct place. |
 |
| This is shooting the Butterfly technique. |
 |
| We tested out the butterfly technique with the reflector to see if it added or improved the image. |
 |
| Finally, we experimented with the Edge lighting technique. |
 |
| Again, ensure the light was in the correct place was essential. |
Health and Safety
During this shoot, there were additional health and safety hazards that must be considered on top of the ones we would consider for an on location shoot. For starters we must make ourselves aware of all the fire exits in the room should we need to use them, ensuring they is a clear pathway to them. This is especially important as we would be using studio lighting and the lamps get very hot. This means we must ensure the handling of these is carried out sensibly, when turned off they must be left to cool before any crew member handles them (protective gloves are advisable) and ensure no flammable material is close by.
As we would be handing electrical equipment we must ensure any wires are taped to floor, this will prevent any trips or falls that could lead to injury or damaged equipment. another point to consider would be that when plugging and unplugging equipment, sockets must be switched off until plug is in place.
We had to ensure that the back drop sheet was securely in place, careful placing of the sheet is vital, should a stool or ladder be need to reach then sensible use is a must, somebody steadying the bottom a ladder (should one be used) is advisable.
Andy Warhol Link
Something that I did notice about this shoot, was the similarities to Andy Warhol's 'Screen Test'. In these 'Screen Tests' were a series of silent films in which Warhol placed a camera in front of 'Warhol celebrities' and friends (for the most part they were amateur or non-actors) and created moving portraits. The subjects were asked to not speak or move and on occasion were left alone with the camera.
The black and white footage, long takes and use of non-professional actors, all shot on a low budget have a lot of relation to the new wave. This was a piece of work that he did in the 1960's, again reflective of the Neuvelle Vague as it is around the same time period.
You can also see from the stills below that Warhol used similar lighting techniques the ones we experimented with on this particular shoot.
 |
| Here we can see an example of REMBRANDT lighting, noticeable by the signature illuminated triangle beneath the eye. |
 |
 |
| This is an example of extreme EDGE lighting, one half of the face is entirely in shadow. |


No comments:
Post a Comment